
How to Make a Bathroom Handicap Accessible
Most bathrooms aren’t built with accessibility in mind. If you’ve ever tried helping an aging parent or a family member with limited mobility navigate a narrow doorway, step into a slippery tub, or reach a high cabinet, you already know the daily strain it creates.
And it's not just a matter of comfort. It's also about safety, independence, and dignity.
This guide walks you through everything you need to know about making your bathroom handicap accessible, from layout and fixtures to local permitting and smart design choices. Let’s get into it.
What Makes a Bathroom Truly Handicap Accessible?
A lot of folks think a grab bar or two is all it takes to make a bathroom accessible. And while grab bars matter, they’re just one piece of a much bigger puzzle. A truly handicap accessible bathroom is one that makes daily routines easier, safer, and more comfortable without needing assistance every step of the way.
Below, let’s come to grips with what actually makes a bathroom functional for someone with mobility challenges not just on paper, but in real-world use.
ADA Compliance vs. Real-World Usability
ADA (American with Disabilities Act) guidelines are important. They give us a baseline. But the truth is, homes aren’t commercial buildings. You’re not designing for the general public.
You’re remodeling for someone specific: a grandparent with a walker, a spouse recovering from surgery, or maybe even yourself down the line.
So while the ADA suggests things like 60-inch turning radiuses and grab bar placements, usability often comes down to customization.
For example, someone in a manual wheelchair may need different sink access than someone using a power chair. ADA gives you the rules. Real life tells you what actually works.
Common Barriers in Standard Bathrooms
Most older homes have bathrooms that were designed to be compact, not accessible. Tight corners, narrow doors, tubs with high thresholds. All of these can be a hazard for anyone with limited mobility.
Slippery bathroom floors and poor lighting just add to the risk. And even something as small as a faucet that requires a twisting motion can turn into a daily frustration.
The bottom line? What works for an able-bodied person can be downright dangerous for someone who needs support.
Key Principles of Accessible Design
At the heart of any wheelchair accessible bathroom design is ease of use. Every decision, from where you place the shower bench to how high you mount the toilet paper holder, should make things smoother.
Universal design is the idea that when a space works well for someone with a disability, it tends to work better for everyone. Think curbless showers, lever handles instead of knobs, and non-slip flooring that looks good and performs better.
Here in Portland, with our mix of bungalow homes and modern infill, it’s totally possible to design a space that feels stylish while still being fully accessible. You don't need your bathroom to feel like a hospital to make it safe.
Planning Your Wheelchair Accessible Bathroom Remodel
If you’ve started thinking about making your bathroom more accessible, chances are it’s because something changed: a new diagnosis, a recent fall, or maybe just watching a loved one struggle in a space that used to work just fine. Whatever sparked the idea, here’s the truth: every accessible remodel should start with a plan that’s personal.
There’s no one-size-fits-all blueprint. What works for someone in a wheelchair won’t always help someone with arthritis. What a 70-year-old needs today might look different ten years from now.
So before you start picking out tile or tearing out that old tub, slow down.
Assess individual mobility needs
This is where everything starts. Are we designing for a wheelchair user who needs a wide turning radius? Someone using a walker who needs sturdy support at every step? Or is it more about making things easier for someone with limited strength, balance, or vision?
A good remodeler will ask detailed questions about daily routines, such as how the person transfers from a wheelchair, where they reach for towels, how they get into the handicap shower. These details shape everything: layout, hardware, even lighting.
At Revive Works Remodeling, we’ve seen firsthand how a simple change, like moving a towel bar or lowering a mirror, can completely transform someone’s comfort in their own home.
Work with CAPS-certified remodelers
Not every contractor is equipped to handle accessibility design. Look for someone with Certified Aging-in-Place Specialist (CAPS) credentials. Or at the very least, someone who understands what those standards mean in real-world remodeling.
CAPS remodelers are trained to think beyond the code. They help you future-proof your space without making it feel clinical. They know how to blend function with aesthetics.
Even if you’re not remodeling for age-related issues, the CAPS approach still applies. It’s all about long-term thinking and making your home work smarter for you and your family.
Future-proof for aging in place
We see a lot of people in their 40s, 50s, and early 60s looking ahead. They’re not dealing with mobility issues yet, but they’re thinking about the next 10–20 years.
If you’re already planning a remodel, it’s smart to integrate accessible bathroom features now. A curbless shower, comfort-height toilet, and slip-resistant flooring might not seem necessary today, but they’ll make a huge difference later, and save you from having to remodel again down the line.
Plus, these features don’t have to look medical. With the right design, they just look like smart, modern upgrades.
Layout Changes for Accessibility
Before you pick bathroom fixtures or materials, you’ve got to get the layout right. If the space itself isn’t easy to move through, nothing else will matter. In older Portland homes especially, tight bathrooms are the norm, and that’s where layout changes make the biggest impact.
Widening Doorways and Clear Floor Space
Some bathroom doors are just 28 inches wide. For someone using a wheelchair or walker, that’s not even close to enough. You’re looking for at least 32 inches of clear width. That might mean reframing the doorway or adjusting nearby walls, but it’s worth it.
Inside the room, you want at least five feet of open turning radius for wheelchairs. That usually requires shifting the toilet or vanity, or even knocking down walls in tighter layouts.
In a classic Portland bungalow, that might mean rethinking a hallway or closet to free up space.
Point is: this isn’t about making things bigger for the sake of it. It’s making every inch usable.
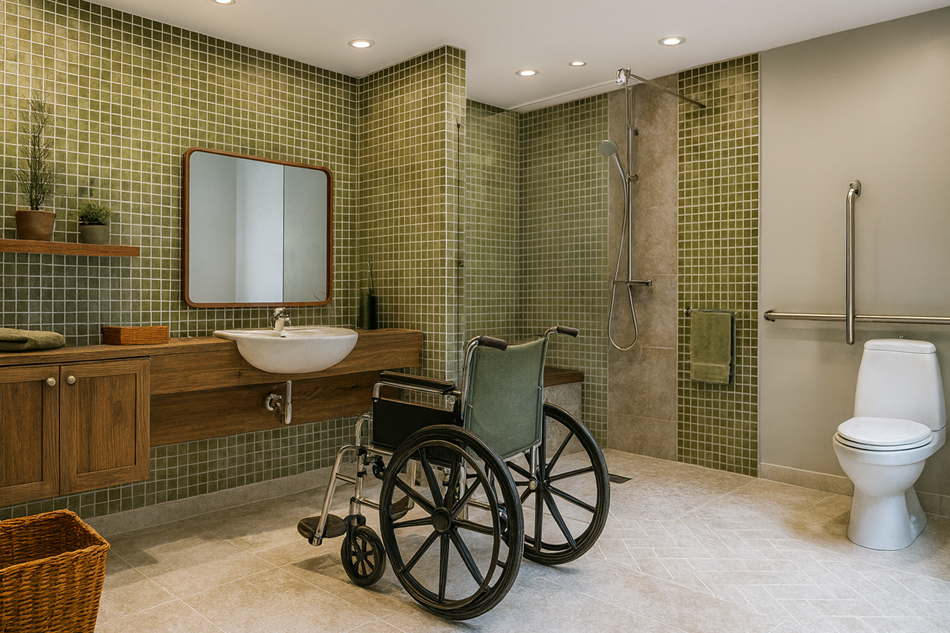
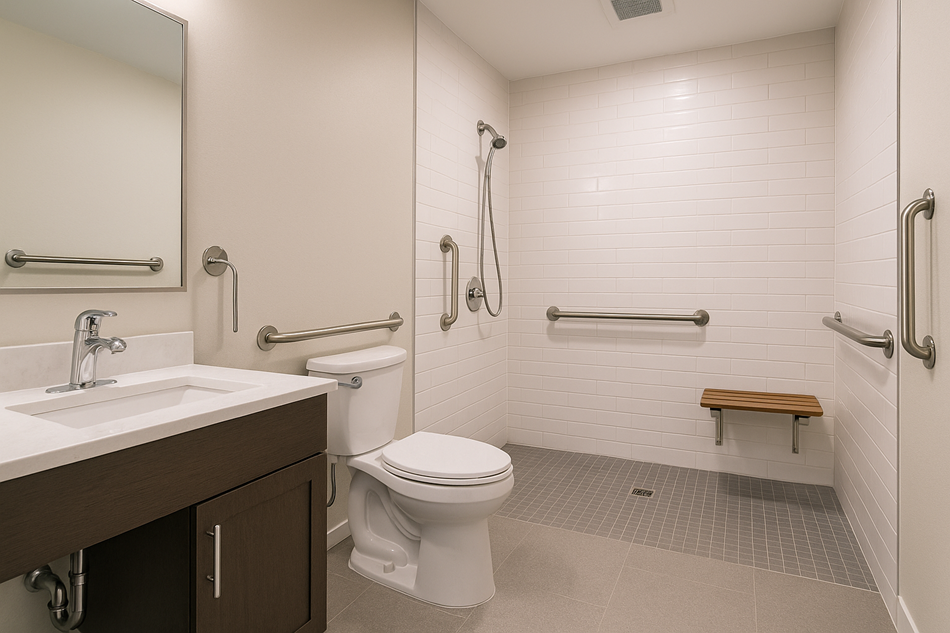
Barrier-Free Shower Layout
This is one of the most important upgrades in an accessible bathroom layout. Curbless, roll-in showers not only look modern. They’re safer, cleaner, and way easier to use.
The goal is a level transition: no step, no lip, nothing to trip over or roll over. That means sloping the floor properly so water drains right without spilling into the rest of the room.
And if you’re using a wheelchair, space matters. You’ll need an opening at least 36 inches wide, with enough room to roll in, turn, and transfer safely.
Wall-mounted benches, handheld shower heads, and grab bars finish the job, but none of that works without the right layout first.
Toilet Placement and Access
The right toilet height matters, but so does where it’s placed. You’ll need at least 18 inches from the centerline of the toilet to the nearest wall on one side (more if there’s a grab bar).
That space allows for safer transfers and better reach from a seated or supported position.
Also, make sure there’s enough clearance in front (36 inches is a good rule of thumb). In a tight space, that might mean shifting the toilet closer to a wall or moving a vanity altogether.
But it’s these adjustments that make daily life easier for people with limited mobility.
Sink Access and Knee Clearance
For someone using a wheelchair, a traditional vanity just won’t cut it.
You need open space underneath the sink, usually about 27 inches of vertical clearance, to allow for roll-up access. That’s why floating vanities or wall-mounted sinks are such a popular choice.
Plumbing needs to be insulated or covered to avoid burns or scrapes. And faucets should be reachable and easy to operate; lever handles or motion sensors make that happen. It's all about creating a space that doesn’t force anyone to strain, twist, or lean.
Fixtures and Features That Support Mobility
Once your layout is set, the next layer is all about what goes into the space. Fixtures and features are where day-to-day accessibility actually happens.
From how someone turns on a faucet to how they steady themselves in the shower, these choices shape the entire experience.
Let’s walk through the must-haves (and the smart upgrades).
Grab Bars and Reinforced Walls
Forget the clunky, industrial-looking grab bars of the past. Today’s options come in sleek finishes, think matte black, brushed nickel, and even wood tones. They can blend right in with your design. But style aside, installation matters more than looks.
The biggest mistake we see is installing grab bars without reinforcing the wall behind them. That can be a serious hazard.
Whether it’s beside the toilet, inside the shower, or along the bathtub, the wall needs solid backing that keeps the bar from ripping out when someone leans their weight on it.
In many homes, that means opening up drywall and beefing up the framing. It’s a little extra work, but it’s the difference between safety and a false sense of security.
Accessible Faucets and Handles
Twist knobs are a thing of the past. They’re hard to grip and even harder to control when you’ve got arthritis or limited strength. The move? Lever handles or touchless faucets.
Lever-style handles can be operated with a hand, elbow, or even a closed fist. Touchless faucets reduce the need for contact altogether, especially helpful when balance is a concern or when you’re using a mobility aid in one hand.
While you're at it, look for anti-scald valves or thermostatic controls. Nobody should have to worry about getting burned just trying to wash their hands or rinse off.
Walk-In Tubs vs. Roll-In Showers
This is one we get asked about all the time: Should I install a walk-in tub, or go with a roll-in shower?
Walk-in tubs work well for folks who enjoy soaking and still have decent mobility. They have doors that open for easier access, built-in seats, and fast-drain systems. But they can be tough to navigate for wheelchair users or anyone who struggles with balance.
Roll-in showers, on the other hand, offer full accessibility: no thresholds, better transfer options, and easier caregiver assistance if needed.
If you’re choosing between the two, think about both your current and future needs.
Lighting and Visibility Enhancements
Good lighting is just as essential for safety. Poor visibility can turn a safe setup into a dangerous one. That’s why we always recommend layered lighting in accessible bathrooms.
You want overhead lighting that doesn’t cast shadows, task lighting near the mirror, and even low-level lighting near the floor for nighttime use. Motion sensors can help for anyone with vision issues or limited dexterity.
Also worth considering: anti-glare finishes on mirrors and tiles. Shiny surfaces might look nice in photos, but in real life, they can make it harder to see and move around confidently.
Flooring and Surface Considerations
When it comes to accessibility, flooring is often overlooked but it shouldn’t be. One bad choice here can undo everything else you’ve done to make the bathroom safer. You want surfaces that provide traction, absorb impact, and transition smoothly from room to room.
Here’s what we always consider when remodeling an accessible bathroom.
Slip-Resistant Flooring Options
Tile is still the go-to in most bathrooms, but not all tile is created equal. Glossy finishes might look sleek, but they’re dangerous when wet.
Instead, we recommend textured porcelain or ceramic tile with a high slip-resistance rating (look for a COF of 0.6 or higher).
Other solid options include rubber flooring (great for cushioning) and vinyl planks with anti-slip coatings. These are extremely helpful for folks who use walkers or wheelchairs, since they reduce friction without adding drag.
The goal? Keep it grippy, even when wet, without making it feel like you're walking on sandpaper.
Transitions Between Rooms
In older homes, it’s common to see awkward thresholds between rooms where tile meets wood or carpet. These raised edges are a tripping hazard, not to mention a nightmare for anyone using a walker or chair.
Your remodel should include flush transitions—no height changes, no bumps. That might mean using ramped tile edges or planning for continuous flooring between the bathroom and hallway. It’s a small detail with a huge payoff in everyday safety and mobility.
Easy-to-Clean, Low-Maintenance Surfaces
When mobility is limited, cleaning becomes a bigger challenge. So choose surfaces that don’t demand constant scrubbing or special care.
Look for large-format tiles with minimal grout lines, sealed natural stone, or vinyl wall panels that mimic tile but wipe clean in seconds. And steer clear of materials that stain easily or need resealing every year.
The easier a surface is to maintain, the longer it stays safe and the less anyone has to rely on others just to keep it usable.
Accessible Storage and Bathroom Accessories
Once the big elements are in place, like the shower, flooring, and layout, it’s time to dial in the smaller things that make a bathroom truly functional.
Storage and accessories may not seem like a big deal, but for someone with limited mobility, they can either support independence or become a daily frustration.
In this stage of the remodel, every inch and every decision matters.
Lowered Storage and Pull-Out Drawers
Think about where your toothbrush is. Or your meds. Or your towels.
If someone has to reach above shoulder height or bend down low every time they need something, that’s not accessible. That’s just tiring and risky.
In an accessible bathroom, drawers should pull out smoothly and fully with enough room to organize essentials without digging. Wall cabinets should be mounted lower than usual or skipped altogether in favor of open shelving at reachable heights.
We’ve built custom vanities in Portland homes with rollout trays, soft-close drawers, and even pull-down shelving to help make the most of tight spaces without asking people to overextend themselves.
Mirror Angles and Medicine Cabinets
If the person using the bathroom is seated, either in a wheelchair or on a bench, standard mirrors won’t suffice. You either get a great view of your forehead or none at all.
One fix is a tilt mirror, which can be angled to meet the user’s line of sight. Another is to install the mirror lower, paired with a floating sink, so there's a clear view from both standing and seated positions.
Medicine cabinets can also be swapped for shallow wall-mounted versions or custom recessed options with adjustable shelves. Just make sure the hardware is easy to grip and doesn’t require two hands or fine motor skills to open.
Smart Accessories for Accessibility
Technology can make a big difference without overcomplicating the space. We can install touchless soap dispensers, voice-controlled lighting, and even smart thermostatic shower valves in homes all over the Portland metro area.
They’re thoughtful tools that reduce reliance on fine motor control and make everyday tasks easier.
Even simple touches like a grab bar that doubles as a towel rack or a nightlight built into the outlet can go a long way in making a bathroom more usable without making it feel sterile.
Costs and Budgeting for a Handicap Bathroom Remodel
When people ask us how much it costs to remodel a bathroom for accessibility, we always say the same thing first: It depends on your needs, your house, and how far you want to take it.
But budget definitely matters. And while there's no one-size-fits-all number, we can walk you through what typically drives the cost up (or helps keep it manageable).
Average Remodel Costs
For a full accessibility remodel, most homeowners spend anywhere between $25,000 and $45,000, depending on the scope. That includes layout changes, barrier-free showers, upgraded fixtures, reinforced walls, and slip-resistant flooring.
If you’re just making selective upgrades, such as swapping the tub for a walk-in shower, widening a doorway, or installing grab bars, you might be closer to the $10,000 to $15,000 range.
Keep in mind: costs also vary based on your home's age and layout. Many older homes (especially craftsman and mid-century builds) need more prep work to move plumbing, adjust framing, or bring electrical up to code.
Financial Assistance and Grants
Accessibility remodeling can be a medical necessity. And depending on your situation, you might not have to pay for everything out of pocket.
Here are a few options worth exploring:
VA Housing Grants – For veterans with service-connected disabilities.
Medicaid Waivers – Your state may offer programs that may cover home modifications.
State and Local Resources – The State of Oregon and local Portland nonprofits sometimes provide low-interest loans or grants for accessibility improvements.
We always recommend talking to your doctor, insurance representative, or a CAPS-certified remodeler about what you might qualify for.
Prioritizing Accessibility Features Within a Budget
Not every project starts with an unlimited budget, and that’s okay. A good remodeler can help you figure out what to tackle now, and what can be added down the line.
In most cases, we recommend starting with:
Barrier-free shower access
Safe toilet placement and grab bars
Non-slip flooring
Improved lighting and doorway clearance
These changes solve the most common risks first: falls, transfers, and maneuverability.
The key is phasing things strategically so that each step adds value and improves safety without wasting time or money later.
Permits, Codes, and Portland-Specific Considerations
Before you start tearing up tile or reworking a layout, there’s one step that can’t be skipped: permits.
Remodeling for accessibility, most notably when it involves plumbing, electrical work, or structural changes, comes with a set of rules. These rules matter.
This is the reality of making lasting, legal changes to your home and avoiding headaches later.
Oregon Building Code and Accessibility
While ADA guidelines typically apply to public spaces, Oregon’s Residential Specialty Code (ORSC) incorporates accessibility standards that impact private homes too, especially if you're doing a major remodel.
Things like:
Minimum clearances for toilets and showers
Barrier-free floor transitions
Proper support for grab bars
Safe electrical placement near water
If your remodel touches plumbing, electrical, or involves altering walls or structural framing, you’ll likely need a permit. And that means the work needs to meet both code and safety standards.
Navigating the Permit Process in Portland
The City of Portland’s permit system is fairly organized, but it still takes time.
Here’s what usually happens:
Your contractor or designer draws up plans
They submit those plans for city review
You wait for approval (timing can vary, especially in peak season)
Inspections are scheduled during and after construction
A reputable contractor will handle all of this for you. But if you’re hiring someone else or considering DIY, be prepared to do your homework. Cutting corners on permits can cost you later if you try to sell the home or file insurance claims.
HOA and Historic Home Limitations
Portland has a good number of historic districts, from Irvington to Ladd’s Addition, and plenty of older homes with original charm (and original plumbing).
If your house is part of a designated district or under a homeowners’ association, there may be extra steps involved.
Some HOAs restrict exterior changes (like expanding a bathroom), and some historic homes require design review even for interior updates if they impact structure or windows.
That doesn’t mean you can’t remodel. It just means you’ll want a contractor who’s dealt with these quirks before and knows how to work within the rules without stalling the project.
Mistakes to Avoid When Remodeling for Accessibility
Making a bathroom wheelchair accessible doesn’t only mean adding a few new features. It’s also about changing how the space functions day to day.
And while the intentions are always good, we’ve seen a few common mistakes over the years that end up costing more, working less, or leading to avoidable do-overs.
If you’re remodeling your Portland home for accessibility, here’s what to steer clear of.
Prioritizing Style Over Function
Nobody wants their bathroom to feel like a hospital. And the good news is, it absolutely doesn’t have to. But too often, we see homeowners go all-in on aesthetic upgrades and gloss over the things that actually make a bathroom safer and easier to use.
Slick tiles that match your Pinterest board? Not great if they get slippery when wet. Floating vanities without reinforcement? Pretty, but useless if someone needs support to transfer.
At Revive Works Remodeling, our job is to help you strike the balance: a space that’s beautiful and built for real-life use. Form should never compromise function.
DIY Grab Bar Installations Without Reinforcement
Grab bars that are screwed directly into drywall… they might hold for a week or a month, but the first time someone puts their full weight on it, that thing is coming loose. And that’s a fall waiting to happen.
Proper grab bar installation requires blocking behind the wall, usually added during framing or with retrofit hardware if the walls stay intact.
This isn’t a weekend DIY project. It’s a safety feature that deserves professional attention.
Not Involving the End User in Design
We’ve seen families remodel entire bathrooms for a loved one, only to realize afterward that the sink is too high, the towel rack’s in the wrong spot, or the mirror is unusable from a seated position.
Talk to the person who’s actually using the space. Better yet, involve them in every step. Their habits, routines, and comfort should drive every design choice, from layout to lighting.
What works on paper doesn’t always work in practice. The best designs come from listening first, building second.
Final Thoughts
Remodeling a bathroom for accessibility is a commitment to safety, independence, and dignity. Whether you’re adapting your space for yourself, a parent, or someone you love, the choices you make now can change how they live every single day.
If you're ready to take the next step, Revive Works Remodeling is here to help. We’ve worked in homes across Portland and know how to make accessible bathrooms feel like home.
Call us today to schedule a site inspection or request a quote. Let’s build a space that works for everyone who walks (or wheels) through it.
Let's Talk About Your Project
From small fixes to full renovations, we treat your home like it's ours. Portland-based, reliable, and actually easy to work with.
Contact Us